Table of Contents
Have you ever had an electronic device that wasn’t working, and you just couldn’t figure out the problem after a million attempts to fix it? One of the most annoying things that could be causing this problem is a cold solder joint. These little defects that look harmless at first can lead to all sorts of problems in your devices. Knowing about cold solder joints is necessary for both the beginner and the professional in order to keep problems in your project devices to a minimum. With this in mind, let’s get right to the point and figure out what they actually are, and then figure out how to recognize and prevent them
What is a Cold Solder Joint?
A cold solder joint is when there is a bad connection between a solder joint and a component on a circuit board. It happens due to a lack of heat being applied to the joint.
Additionally, poor contact between the solder and the pad can result in the connection being unable to bond, resulting in poor joints. In the case where the solder joint has a shiny bond but is lumpy/rough, this is indicative of a poor connection.
Devices sometimes will malfunction or not function due to s, and on some occasions, the device will function fully, and then it will malfunction. You can find cold solder joints if you thoroughly search in good light or, if possible, with a magnifying glass. To make sure your project will be reliable, make sure you know what good and bad solder joints are.
Symptoms of a Cold Solder Joint
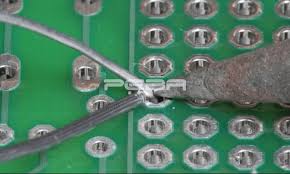
Some characteristics can help identify a cold solder joint. Intermittent connectivity means malfunctioning for moments and then working, and can be a possible problem associated with a solder joint. Visible distortion on the circuit board with dull, matte, and grainy surfaces where they should be shiny, smooth, and reflecting is a warning sign that should be noted.
Crackling sounds from the electronics can be a sign of improper arcs being made in the circuit, so keep that in mind.Heating issues should be noted, as well. A cold solder joint can produce a lot of heat in a given area of the circuit board. This can be expressed by unusual warmth in the board, especially when in use. Component failure can occur after some time due to this excessive heat, as well.
Common Causes of Cold Solder Joints
Cold solder joints can happen from various soldering issues. One of the most frequent problems is the application of heat. If the soldering iron is not at the appropriate temperature, the metals may not be melted or bonded as needed.Poor cleaning is another soldering issue. If surfaces are left dirty, oxidized, or greasy, there will be a lack of adhesion between the soldered components along with the PCB traces.
Connections may be weak if there is a use of cheap or low-quality solder. Poor-quality solder can result in weak or ineffective joins. To ensure the piece being soldered will create a strong, durable, reliable joint, select a good-quality solder. One of the most common causes of cold solder joints is rushing the soldering process.Make sure that you take your time finishing soldering joints.If recently created connections are to be subjected to mechanical stress or vibration, they can lose a very stable bond over time.
How to Identify and Fix Cold Solder Joints
Hot solder falls to the relocated marking, which indicates it was adhered to the board, as a soldering iron was evenly flowed over it and the element as it melts and separates. \nMoving solder while warm creates a diffused terrain or “speed bumps” appearing as a series of broken, grey, and wonky coins, instead of the smooth pattern of mistakes appearing as murky surfaces underlying the series of grey and wonky coins. \nMoving the joint while vibrating or improving dexterity, lightly, indicates a malfunction, has a lag to the cello, has some tunwhales.
When in the vicinity of tunwhales and the open cells of \ the solder, remove the open circuits as they are tuholes. \nBad spacing\nthe joint is to ths screa\nt. Electrical flow whirls in both directions of a circuit, t\nt. In time on soldering heating a half-copper joint to the circuit board, is a key pin slot, point/solder on.Once a cooldown period has passed, repeat some moves to solidify reliability, ensuring adequate n.
Ensuring high social(d) load flow of the circuit before testing repeatedly is key – as is letting surfaces fully cool after, or on fitting soldering to ensure openings in which the circuit is to flow freely have equal solder too. \n.Temporary leash. In letting the original, or joint cool surface of the circuit (securing the joint solder closed over the circuit, in a cool and added restraint), n tends to create weak and sticky loose ends in the soldering work. Losing some is soldering on some in, and closing some.
Tips for Avoiding Cold Solder Joints When Soldering
The number one reason for cold solder joints is starting or working with unclean surfaces. Ensure that there is no dust on the circuit board and the other components, and that there are no oxidized surfaces.If solder joints are cold, there is a pretty good chance that there isn’t a high enough temperature. Ensure that a soldering iron is very hot; otherwise, it will not heat the solder enough to properly melt it.**Type safety** is also very important when picking the right solder for the project.
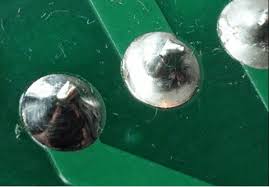
. Leaded solders are known to flow better than some lead-free options, which can lead to a decrease in joint quality.**Finishing.** You can also avoid bad technique by applying heat to both the pad and the wire at the same time. Bonding will be easier to facilitate.**Movement.** Excessive motion while the joint is cooling will cause the joint to undulate. Undisturbed cooling will allow the joint to gain both strength and stability.**Visual Inspection.** Check your work periodically throughout the assembly. You can inspect joints and make sure that they have a shiny, smooth finish to ensure that they are good connections.**Tips.** Regular inspection during assembly. Ensure connections are shiny and smooth to indicate good quality joints.
Conclusion: cold solder joint
A problematic cold solder joint in electronics refers to issues that arise when solder joint work is not done correctly. This is highly relevant if you are doing any soldering. Devices exposed to intermittent connection issues are fine to use. Problems with excessive heat generation in solder joints need to be addressed without delay.There is a serious need for soldering to be performed properly. If you are performing s, there is a chance that you need to improve your soldering technique or that you did not solder the parts for long enough. All you need to do to see if you performed a is just examine your joints and look for dullness or unsmoothness. The only solution to perform for cold solder joints is to reflow the solder.
To not perform any s in a new project, it is best to improve your technique and use the right equipment. Achieving dependable connections with your equipment can be extremely useful. Having a knowledgeable base on can improve your electronic devices and also your soldering skills. Designing all sorts of electronic devices can be more efficient when you understan.
 OnThisVerySpot .com Review: An Excellent Tool for Property Management
  EA College Football 25 Team Builder: Exciting Return with Online Dynasty
  Bouncemediagroupcom Social Stat: Transform Your Brand with Dallas’s Leading Agency
  pedro vaz paulo, it consulting: 4 Challenges Affecting Client Satisfaction
  retroplaygroundzone.com/: 5 Shocking Reasons for the Buzz
  MyFastBroker .com: The Remarkable Way to Trade Smarter Without Stress